
3D Stage Visualizer User Guide
3D Stage Visualizer: Live DMX & MVR (internally StageViz) is a Windows application that displays a light show in 3D in real time — it loads MVR scenes and GDTF fixture profiles and receives live DMX over Art-Net or sACN. This guide covers everything from the first launch through fixture placement and combining several MVR files to troubleshooting. It applies to version 1.4.6.
First launch
- Install the app from the Microsoft Store (3D Stage Visualizer: Live DMX & MVR). The desktop edition ships with DMX Music Visualization AI (download here) and is launched from it.
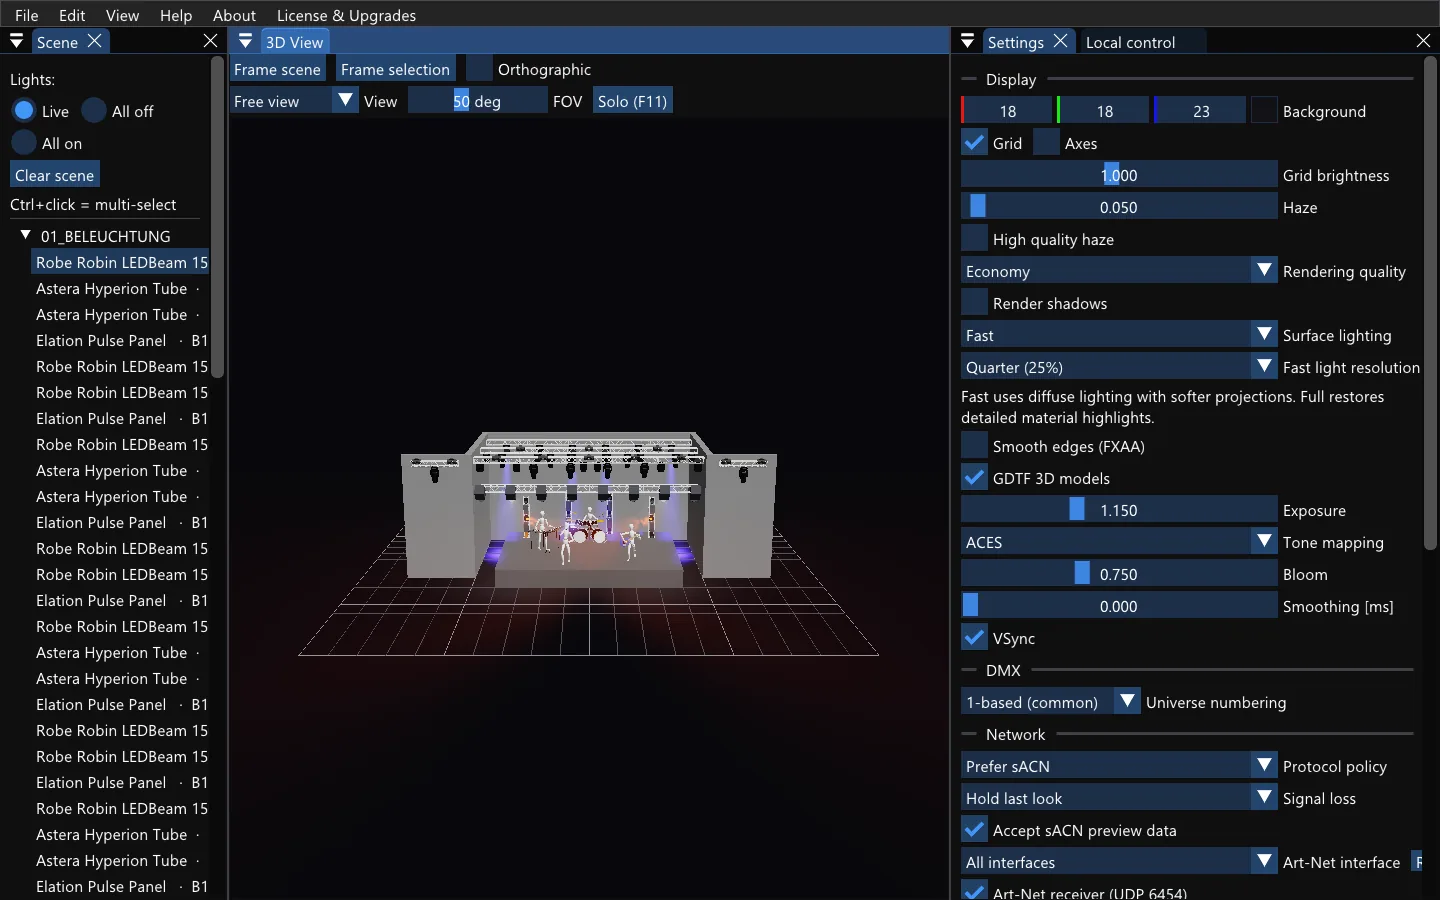
- The first start without a saved session opens the sample scene SampleMidStage.mvr — 76 fixtures, 8 of them lit in blue, amber and white. The camera frames the whole stage. (An existing session takes precedence.)
- Try the lights without a console: open View → Local control, select a fixture in the Scene tree and move the dimmer, color or pan/tilt.
- Your own show: drag an
.mvrfile into the window (or File → Open MVR…). The F key frames the scene at any time. - Live data: enable Art-Net or sACN output on your console or software into the network where the visualizer runs. Keep Lights: Live in the Scene panel and click Release all local controls in Local control. (DMX Music Visualization sends data to the visualizer by itself.)
Working with DMX Music Visualization
StageViz shows everything that arrives over DMX in 3D; the music-driven show itself comes from DMX Music Visualization AI. The typical workflow of the SOH ecosystem:
- In the GDTF Stage Studio library at gdtf-lights.com (9,500+ fixture profiles) pick your lights and set the quantity and DMX mode for each.
- Click DMX → Export TXT or MVR 3D. Choose one of 23 fixture layouts (truss rows, gates, circle, towers, floor rows…), trim height and spacing — the generated MVR contains fixtures with embedded GDTF files, a complete DMX patch and truss structures. File → Generate MVR opens the same generator straight from the app.
- Drag the file into DMX Music Visualization and confirm with Enter — AI generates the complete show including scenes, chases and quick-function buttons.
- The MVR appears automatically in 3D Stage Visualizer — DMX Music Visualization opens the visualizer itself, hands over the scene and streams Art-Net. You watch the show driven by your music live in 3D.
The detailed procedure is in the DMX Music Visualization manuals and the GDTF Stage Studio guide. The same MVR also opens in grandMA3, Capture, Depence, Vectorworks, MagicQ, WYSIWYG or BlenderDMX.
System requirements
| System | Windows 10 / 11, 64 bit |
|---|---|
| Graphics | Driver with OpenGL 4.3 core support for hardware rendering — Intel HD Graphics from the Haswell generation, practically any newer NVIDIA or AMD. Keep the drivers up to date. |
| Software mode | Without OpenGL 4.3 a slower software rendering mode (Mesa) runs. The Microsoft Store edition bundles it; the desktop edition offers it as an on-demand download. |
| Network | Input on UDP 6454 (Art-Net) and/or UDP 5568 (sACN) on the right network interface. The local scene preview needs no connection; the MVR generator, online AI and Store purchases do. |
The load depends on the scene, enabled effects, window resolution and the graphics card. OpenGL support alone does not guarantee a particular frame rate — use lighter settings for large shows (see Speed and render look).
Scene from MVR, fixtures from GDTF
MVR (My Virtual Rig) is the standard scene exchange format — most consoles and planning tools export it. It contains fixtures with DMX addresses, positions and embedded profiles, plus scenery (trusses, stages, set pieces). GDTF (General Device Type Format) describes one fixture type: DMX modes, geometry, 3D model, gobo and color wheels. An MVR by itself is neither a music project nor a DMX show recording.
Opening an MVR
- Open the file with File → Open MVR… or just drag it into the window.
- If a scene already exists, the app asks: Add to scene, Replace scene or Cancel. The same file can be added repeatedly — another copy of its objects is created.
- Imports during use run in the background; the Import progress window lets you Cancel import. The current scene stays usable until the finished import is taken over.
- Coordinates are converted automatically: MVR uses Z-up and millimetres, StageViz Y-up and metres.
- File → Generate MVR opens the GDTF Stage Studio MVR generator in your browser.
- File → New Scene clears everything — save your work first with Save Show As….
Fixtures from GDTF
- Drag a
.gdtffile into the window — the fixture is added to the scene, patched, selected and framed by the camera automatically. The profile is also stored in the GDTF Library panel. - Add more units in Patch → Add fixture: choose Type, Mode, Universe, Channel and quantity; several rows at once with Add row.
- Fixture profiles are available at gdtf-lights.com or gdtf-share.com.
Patch, selection and local control
Patch panel
- Fixture list: name, type and mode, universe and address, channel count. Search by name, type, mode or layer; filter and Sort by name; Select filtered selects everything the filter shows.
- Bulk edit changes the patch of several selected fixtures at once. Universe occupancy shows occupied addresses and overlaps — a shared address is allowed and only flagged.
- Mode and DMX breaks: the DMX mode (Fixture mode), light output summary, Profile compatibility details (detailed profile diagnostics) and a separate Universe and Channel per DMX break — confirm with Apply address; Unpatch removes the fixture from the patch.
- Inspector at the bottom: channel by channel geometry, address, raw value and attribute according to GDTF — ideal for debugging a patch.
Selection
Select a fixture in the Patch list, in the Scene tree or by clicking in the 3D view. Ctrl+click adds and removes items. Highlight lights the selected units at full — quick to locate a unit in a big rig.
Local control
- The Local control panel (View menu) overrides values of the selected fixture for a local preview — dimmer, color, pan/tilt and other attributes according to its GDTF profile. Profile defaults restores the profile defaults, Full dimmer sets full dimmer.
- The values are saved with the session. StageViz sends nothing to physical fixtures — it is a preview.
- Scene → Lights: Live (live DMX data), All off, All on. All on is a helper full-white preview, not a reproduction of your DMX program.
- To return to live control click Release all local controls and verify in DMX Monitor that data arrives.
Move and rotate a fixture
- Select an existing fixture and expand Placement in the Patch panel.
- Enter Position [m] on the X, Y, Z axes in world coordinates (metres, Y up). Ctrl+click on a numeric control allows direct entry.
- Adjust Rotation X/Y/Z [°] — offsets from the imported mounting orientation around the world axes, applied in the order X, Y, Z. Zero values keep the original rotation from the MVR; the original tilt and scale are retained.
- Revert with Edit → Undo (Ctrl+Z), repeat with Redo (Ctrl+Y). Restore original MVR placement restores the original position and orientation of the selected fixture — this step can be undone too.
![Patch panel with the Placement section: Position [m] X/Y/Z fields, Rotation X/Y/Z in degrees and the Restore original MVR placement button](/assets/manual_placement.webp)
Moving the mounting affects both the model and the beam. DMX Pan/Tilt remains the separate control of the moving head. The feature edits fixture placement; StageViz takes the stage, trusses and set pieces from the MVR — from GDTF Stage Studio, CAD or a console.
Combining several MVR files into one
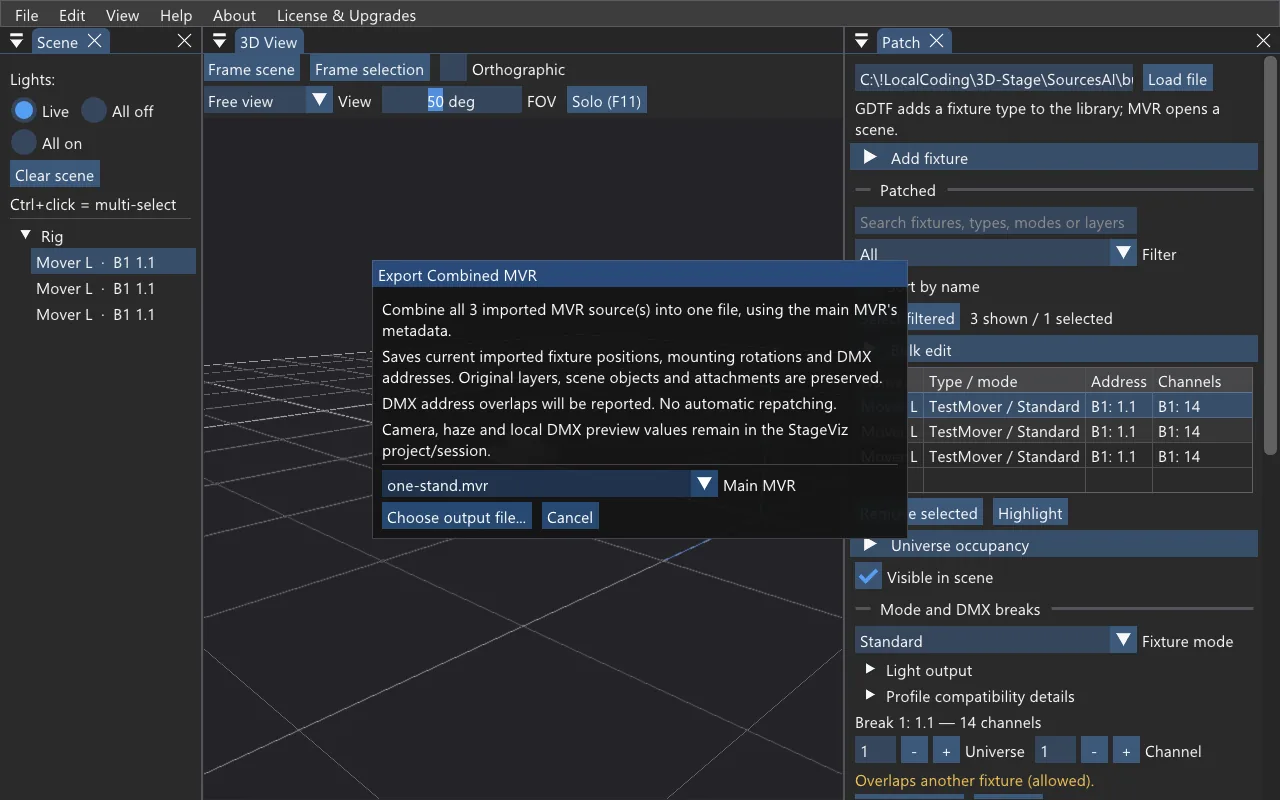
Stage in one MVR and stands with lights in another? Open them side by side, fine-tune the fixture placement and save everything as one file with File → Export Combined MVR… — for a console, another visualizer or your archive.
- Add to scene — open side by side
- Patch → Placement — fine-tune placement
- check DMX address overlaps
Procedure
- Open the main scene with File → Open MVR….
- Open or drag the next MVR into the window and choose Add to scene. Repeat for every rig; the same file can be added more than once.
- Adjust fixture position and rotation in Patch → Placement; check address overlaps in Universe occupancy.
- File → Export Combined MVR… → choose the Main MVR (the first import by default) → Choose output file….
original-name.combined.mvris suggested; imported originals cannot be overwritten.
The export runs in the background over a captured copy of the patch. The result, including warnings,
is shown in a dialog and written to the Log panel under the MVR_MERGE tag.
What the output file contains
- All layers and groups, scene objects, auxiliary data (symbols, classes, positions, mapping), GDTF profiles, 3D models and other attachments from all imports.
- The header and metadata of the selected main MVR; user data of the other imports is appended. The MVR format version is raised to at most 1.6, and only when an added file requires it — the dialog tells you.
- The current position and rotation of the imported fixtures and their DMX addresses including additional DMX breaks. Other original fixture data is retained.
- Identical GDTF files are shared (compared by content); different files with the same name get a distinct name and references are rewritten — the same applies to 3DS textures and glTF/GLB buffers. Identifier (UUID) collisions are resolved stably per import instance.
- DMX addresses stay exactly as patched; any overlaps are reported.
- A scene with universe 0 is written with 0-based numbering — the dialog prompts you to switch.
- Before writing, the ZIP archive, attachment identity and resulting transforms are verified; the file is written via a temporary file, so an interrupted export never damages an existing file.
Saving: MVR, Show or Session?
| What you want to keep | Use — what is saved |
|---|---|
| Edited fixture placement for another MVR application | File → Save Modified MVR As… — positions and mounting rotations of existing fixtures in a copy of one original MVR |
| Several imported scenes as one file | File → Export Combined MVR… — all imported MVR files with the current fixture placement and addresses (see Combining several MVR files) |
| Your StageViz work in progress in its own file | File → Save Show / Save Show As… — a portable .stageviz file with the scene, profiles, original MVR files, camera and settings; opened with Open Show |
| The current working environment | File → Save Session (and automatically on a regular exit) — scene, settings, camera, Local control values and the panel layout |
Save Modified MVR As…
With several imports first pick the Source MVR, then Choose output file… and a new name. The result shows the number of changed fixtures. The imported original is protected (it cannot be overwritten, even through another path). The original patch, GDTF and other archive objects are retained; an export without changes keeps the original ZIP byte for byte. Address and mode changes and added or removed objects are saved with Save Show; Export Combined MVR… writes the current addresses of all imports.
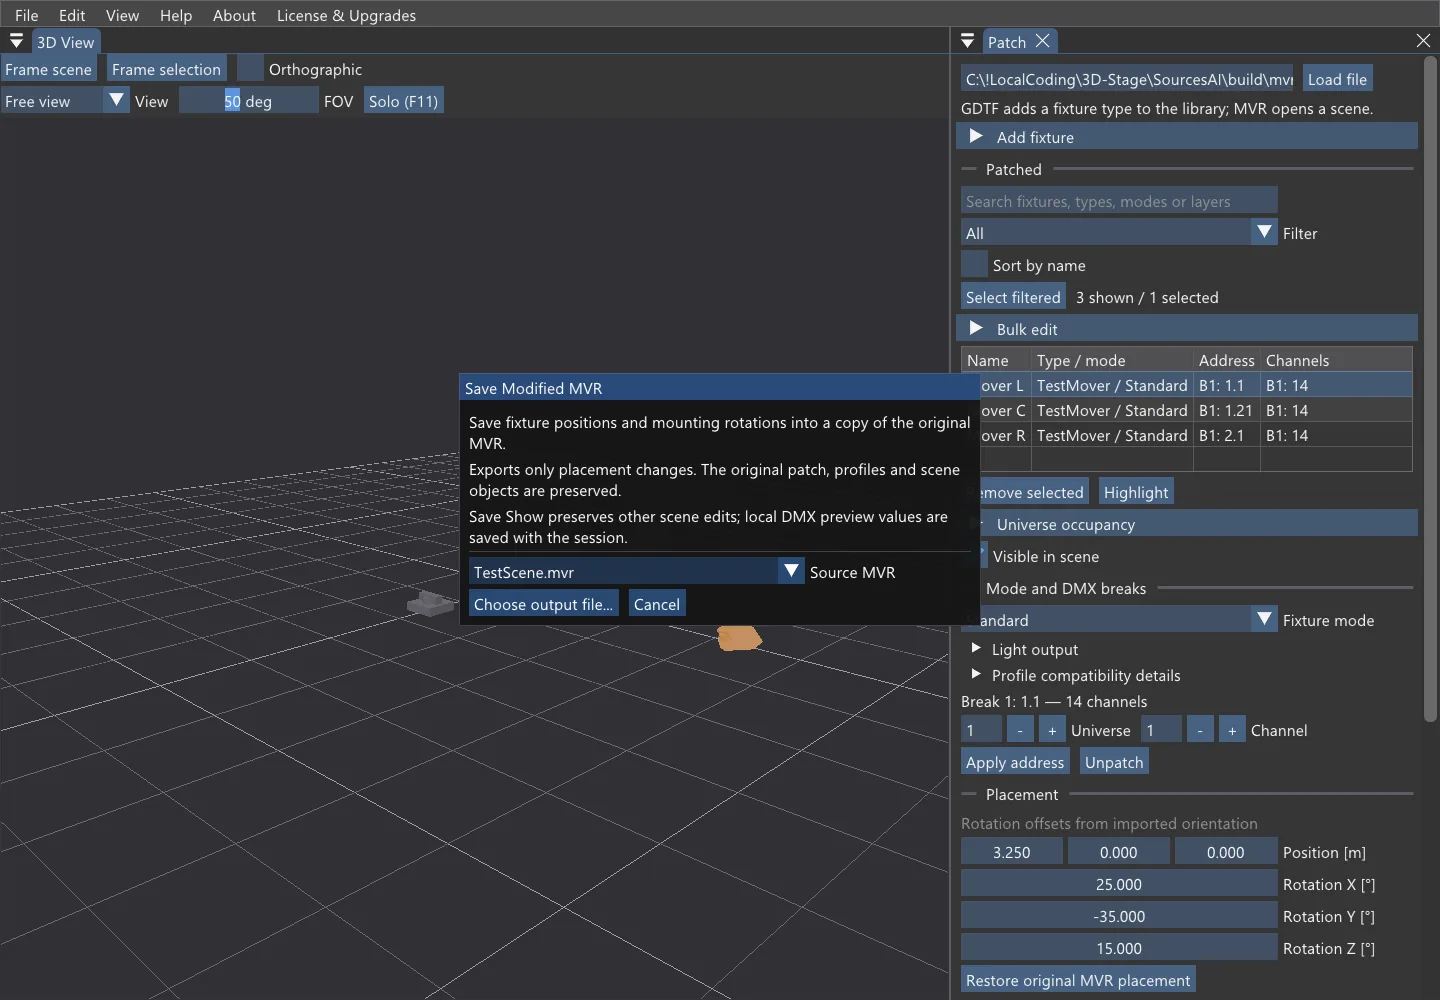
New shows and sessions keep the original MVR files (deduplicated by content), so the export works even after the original has been moved. An older session without an embedded MVR needs the unchanged source at its original path; a changed or missing source is refused — re-import the scene in that case.
Connecting Art-Net and sACN
The visualizer receives DMX over the network. Enable both receivers in Settings → Network, where you also pick the network interface that matches the console's network.
| Art-Net | UDP 6454, unicast and broadcast. Port-Address 0–32767 is used directly as the universe number in the patch. HTP merge of at most two sources; source timeout 10 s. |
|---|---|
| sACN (E1.31) | UDP 5568, unicast and multicast according to the patched universes (including DMX breaks); network universes 1–63999. Respects priority — the highest wins, ties are HTP-merged across up to eight sources; supports synchronization, preview and stream termination. Source timeout 2.5 s. |
Console / software on another computer
- Being on the same network is enough. Set Art-Net or sACN output and the right universe on the console — the DMX Monitor panel shows received packets, the source (IP / CID, priority) and live channel values.
Console / software on the same computer
- Set the sender output to
127.0.0.1(or broadcast255.255.255.255) — otherwise the packets never leave the sending application. Leave the receiver on the default interface.
Universe numbering and source policy
- Universe numbering (Settings → DMX) changes how numbers are interpreted, not the addresses in the patch. Art-Net uses the patch number directly. For sACN, network universe N matches patch N with 1-based numbering, or N−1 with 0-based — so do not judge a match only by the label "Universe 1" on different devices.
- Protocol policy: Prefer sACN / Prefer Art-Net / HTP across protocols. Signal loss: Hold last look or Blackout after all eligible sources are lost. Accept sACN preview data controls the reception of preview packets.
- Reception runs in its own threads separate from rendering; interface changes and multicast membership are dynamic.
Camera controls
| Left mouse button | orbit around the scene |
|---|---|
| Right / middle button | pan the view |
| Wheel | zoom in / out |
| F or View → Frame Scene | frame the whole scene into the visible area; Frame selection frames the selected objects |
| 1–4 / Ctrl+1–4 | recall / store a camera bookmark |
| Orthographic | orthographic (undistorted) view; FOV sets the perspective field of view |
| F11 / Solo | standalone 3D view without panels |
| Reset camera (Settings → Camera) | default orientation + framing of the scene |
Application panels
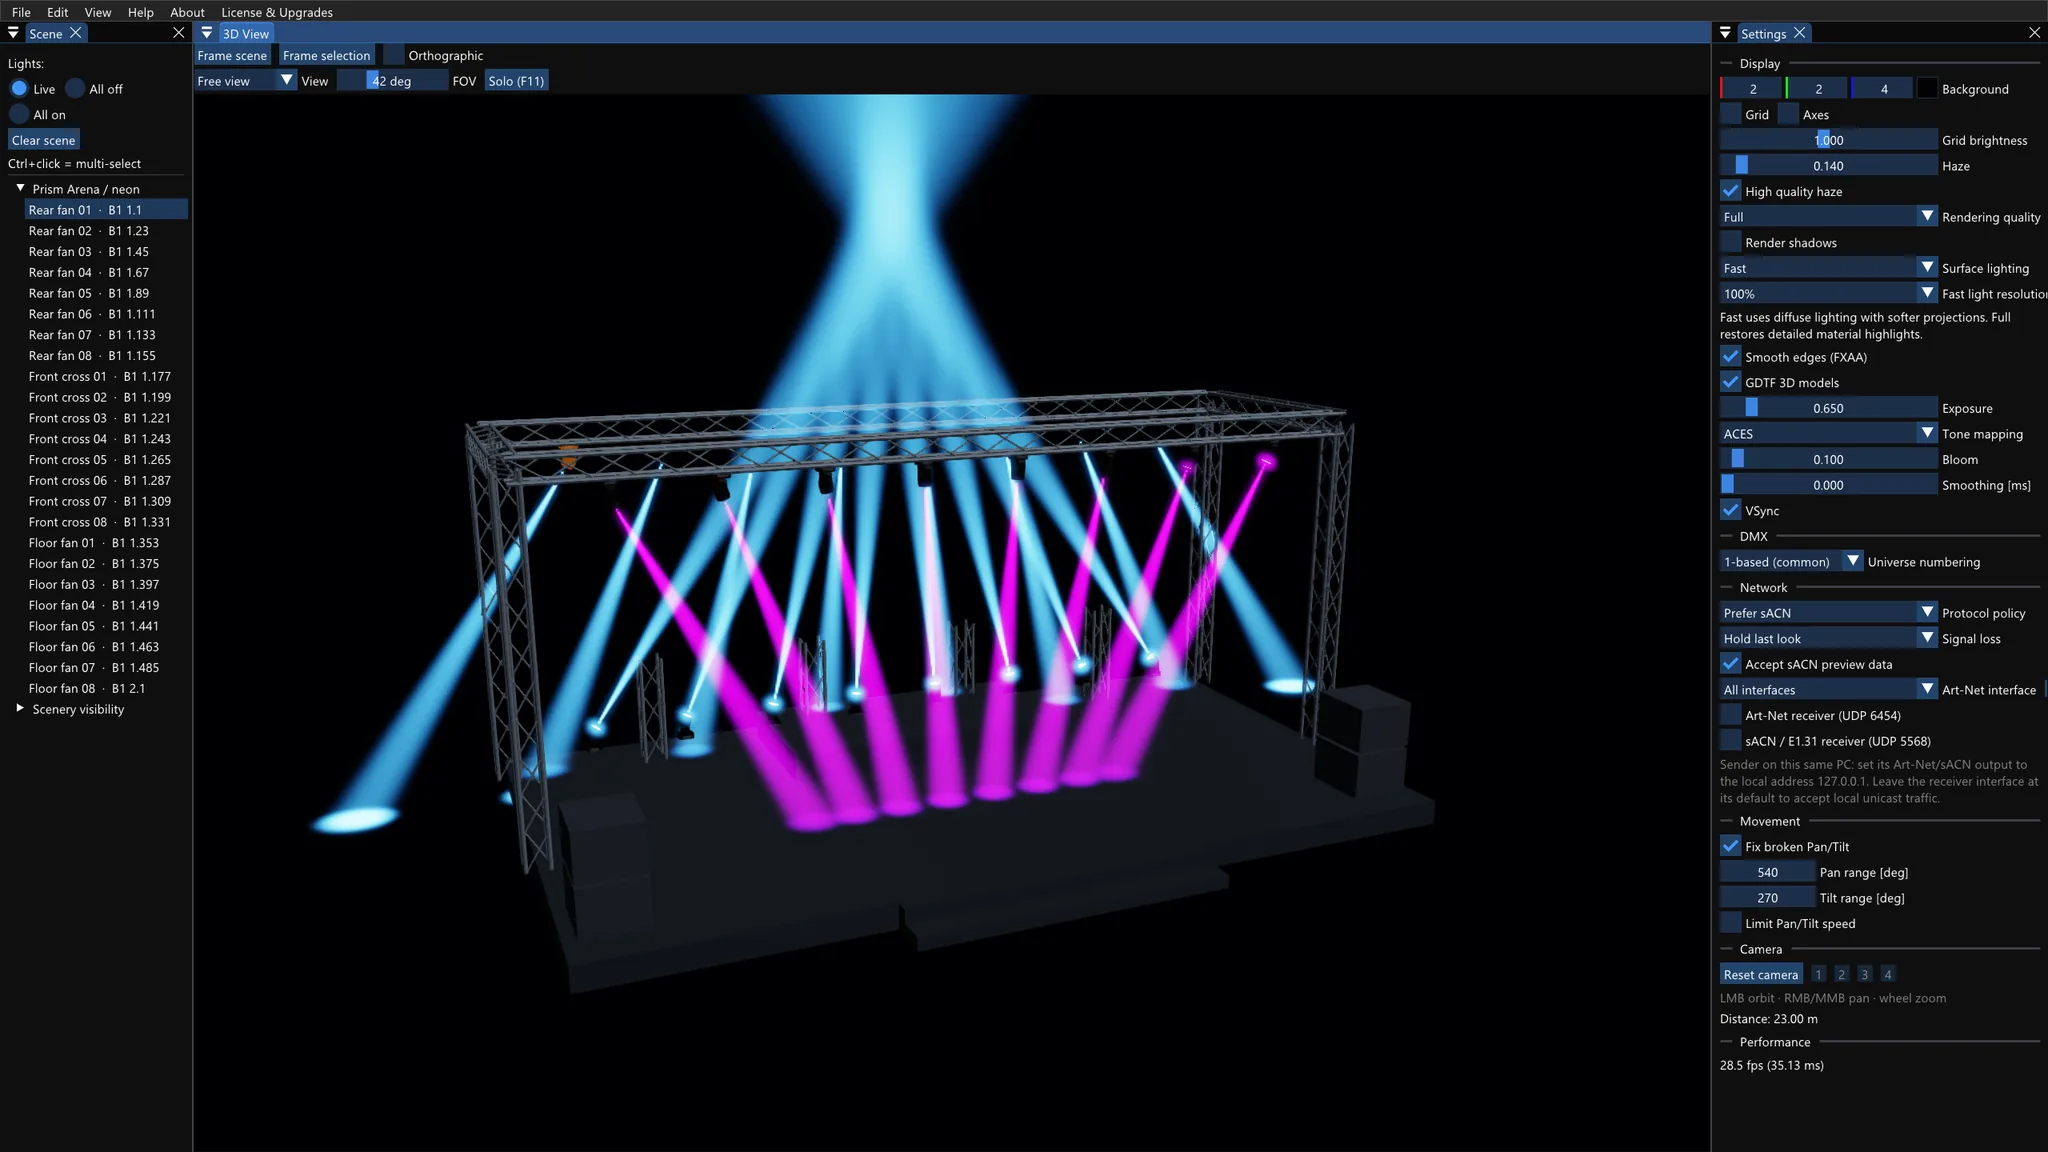
The panel layout is dockable — drag panels where you need them; the app remembers the layout in the session. Reopen closed panels from the View menu.
Scene
- Scene tree by MVR layers; click to select a fixture (Ctrl+click = multi-select). Scenery visibility hides or shows scene objects.
- Lights: Live / All off / All on and Clear scene (clears everything).
Patch
- Fixture list, addresses, modes and DMX breaks, universe occupancy, Placement and Inspector — see Patch and local control.
Settings
- Display — background color, grid and axes, Haze and High quality haze, Rendering quality, Render shadows, Surface lighting and Fast light resolution, Smooth edges (FXAA), GDTF 3D models, Exposure, Tone mapping, Bloom, Smoothing, VSync.
- DMX — Universe numbering (1-based / 0-based).
- Network — Protocol policy, Signal loss, Accept sACN preview data, network interfaces and enabling the Art-Net and sACN receivers.
- Movement — Fix broken Pan/Tilt (Pan/Tilt ranges), Limit Pan/Tilt speed.
- Camera — Reset camera and bookmarks 1–4; Performance shows the current frame rate.
DMX Monitor
- Universes and their numbering (patch / network), source IP or CID, priority, source state, sequence and synchronization.
- Grid of live values of all 512 channels — ideal for debugging a patch.
GDTF Library, Local control, Log
- GDTF Library — loaded fixture types and their modes.
- Local control — local values of the selected fixture (see above).
- Log — imports, exports (
MVR_MERGE), network and any errors, with a level filter. The same content goes to the filestageviz.log(previous runsstageviz.1.log,stageviz.2.log).
Speed and render look
Start with Rendering quality Economy, Surface lighting Fast and Fast light resolution Quarter (25 %), with Render shadows, High quality haze and FXAA off. Haze 0.05 gives a light atmosphere, Haze 0 the fastest preview without volumetric fog. Add only the effects you need, one by one.
| Rendering quality | Full full detail and shading; Balanced limits distant detail (shadow budget up to 64 visible light facets); Economy larger savings (up to 16 facets). Fixtures over the budget stay lit — it is a shadow budget, not a fixture limit. |
|---|---|
| Surface lighting | Full more detailed material response and highlights; Fast quick diffuse surface lighting with softer projections and a selectable resolution of 100 % / Half / Quarter; Off no surface lighting — movement and lit lenses remain, the atmosphere is controlled by Haze. |
| Haze / High quality haze | Atmosphere density 0–2.0 (0 disables the volumetric render). High quality haze increases atmosphere sampling; off saves performance. |
| Render shadows | Shadow maps on surfaces and in the atmosphere. Off = no shadow passes; light may then pass through objects. |
| GDTF 3D models | Off uses simpler bodies with the moving geometry retained — model and beam follow the same movement. |
| Exposure / Bloom / Tone mapping | Image brightness (0.4–2.5), glow of bright sources (0–2.0) and the HDR to sRGB conversion: ACES, Reinhard or Linear. |
| Smooth edges (FXAA) | Anti-aliasing of the final image; independent of Smoothing. |
| Smoothing [ms] | 0–200; smooths continuous DMX parameters (dimmer, color, pan/tilt), 0 = off. Discrete gobos and shutter are not smoothed. |
| VSync | Synchronization with the monitor; it does not determine the scene computation cost. |
For the fastest orientation try Surface lighting Off, Haze 0, simple models and a smaller window. Speed depends on the graphics card, resolution, the number and overlap of lighting effects and the scene geometry — a particular frame rate is not guaranteed for an arbitrary scene.
GDTF and lighting effects
- GDTF profiles — DMX modes, physical function values, ChannelSet, geometry references, pixel addressing, multiple DMX breaks and multi-byte channels. Fixture and scene 3D models from 3DS, glTF and GLB.
- Movement — Pan and Tilt according to the profile geometry and pivots, with smooth catch-up like a real head (optional Limit Pan/Tilt speed).
- Intensity and color — dimmer, shutter/strobe, color wheels (including continuous rotation), RGB/RGBW and other additive colors, CMY, CTO; pixel fixtures (battens, washes) and channel relations according to the profile.
- Gobos — indexing, rotation, shake and other mapped attributes, multiple image layers; the gobo is visible in the beam and in the projection on the floor and scenery.
- Optics — zoom, iris, prism with facets and independent rotation, frost (also widens a beam without a gobo); focus, frost and shutters are visual approximations. Wash and profile fixtures may show a wider, weaker cone in haze than a beam.
- Fix broken Pan/Tilt (Settings → Movement) repairs unusable ranges and unambiguously wrong beam-to-head bindings in poor-quality profiles. Ambiguous multi-head cases are left alone, and it does not replace checking the correct DMX mode.
Lasers
Laser fixtures are recognised automatically (by the GDTF <Laser> geometry, images or
function names) and drawn like a real laser: the pattern sent into space forms a light surface — a circle
a hollow cone, a line a flat fan — with a bright impact on the floor.
- Where patterns come from: 1) vectorization of images from the GDTF (
wheels/folder — works even from a photo of the pattern), 2) DMX value names (Circle, Line…), 3) the built-in shape library (line, circle, triangle, square, star, wave, fan…). - DMX control: pattern selection, rotation, rolling X/Y, offset X/Y, size X/Y, progressive drawing, colors including color macros.
Licenses and editions
| Free / A | live input for 1 universe, addresses 1–128 |
|---|---|
| B — 512 Channels | 1 universe, all 512 addresses |
| C — 6 Universes | up to 6 universes, 512 addresses each |
| D — Max Universes | the top edition without further license limits on the number of universes — within the Art-Net/sACN protocol ranges, internal addressing and PC performance |
- The limit applies to live input only — opening MVR, editing, saving and local control are unlimited in every edition.
- Free receives exactly the address range 1–128, not any 128 occupied channels. When the universe count is exceeded, the lowest patched universes are received, including DMX breaks.
- The Store edition starts Free; purchased add-ons are permanent licenses (not subscriptions) applied through your Microsoft Store account. The active edition, offers and Restore purchases (after an account change or a fresh install) are in License & Upgrades. The Store shows the price before purchase.
- The desktop edition D (part of DMX Music Visualization) has a fixed full license and is no proof of a Store purchase; the Music Visualization license is separate. The license is not stored in a Show or Session.
Command line and integration
For advanced users and automation. --help prints the current complete list of parameters.
stageviz.exe --mvr "C:\shows\scene.mvr" | opens an MVR scene |
|---|---|
--show "C:\shows\scene.stageviz" | opens a portable show |
--gdtf "C:\profiles\fixture.gdtf" | loads a fixture profile |
--patch "gdtf;mode;universe;start[;x;y;z]" | patches a fixture from the command line |
--width, --height, --novsync | window size and VSync |
--frames, --seconds, --screenshot | limited run and screenshot (automated tests) |
--softgl / --hwgl | forces software / hardware rendering |
--version, --help | prints the version / help and exits without starting the renderer |
- Paths support Unicode. The app is associated with the
.mvr,.gdtfand.stagevizextensions. - The Store edition has the alias
soh-stage-visualizer.exe; do not use a fixed versioned path intoWindowsAppsfor long-term integration. - Integration via WM_COPYDATA (main window by PID, UTF-8 path):
dwData1 = open with prompt, 2 = replace, 3 = add, 4 = clear, 5 = reset camera. Acceptance of the message confirms queueing; the import result is in the Log. Use network DMX for changing values, not repeated MVR opening. - Application data: desktop — a writable
configfolder next to the program, otherwise%LOCALAPPDATA%\SOH\StageViz; Store —%LOCALAPPDATA%\Packages\SOHSoundLights.3DStageVisualizerLiveDMXMVR_qtcg4c8s38yej\LocalState.stageviz.loglives there too.
Troubleshooting
| The app does not start — OpenGL message | The graphics driver lacks OpenGL 4.3 core. Update the driver; if the GPU cannot do 4.3 at all, use the software mode (Store: bundled, desktop: offered as a download; slower but runs anywhere). |
|---|---|
| A fixture is not lit | Lights: Live, Local control released, correct GDTF Mode, open dimmer and shutter, addresses in the patch, incoming DMX in DMX Monitor (universe 0/1!), target 127.0.0.1 for a sender on the same PC, license range. |
| Only part of the scene is lit | License range (Free: 1 universe, addresses 1–128), DMX breaks, patch occupancy and the universes the console actually sends. |
| The model moves but the beam does not (or vice versa) | Current app version, correct profile and mode, Settings → Movement → Fix broken Pan/Tilt. |
| The beam is not visible in space | Haze above zero, open shutter and dimmer; a wash has a wider and weaker cone than a beam. |
| The scene slows down with All on or a big show | Economy, Surface lighting Fast / Quarter, Render shadows and High quality haze off, Haze 0; for further savings Surface lighting Off and GDTF 3D models off. |
| Changes are missing from the exported MVR | Save Modified MVR As… carries the placement of existing fixtures, Export Combined MVR… also addresses and all imported scenes; the whole project is saved with Save Show. |
| The export reports a missing or changed source | An older session without an embedded MVR needs the unchanged original file at its original path — restore it, or re-import the scene. Details are in the Log. |
| Export Combined MVR asks for 0-based numbering | The scene uses universe 0 — switch to 0-based numbering in Settings → DMX and repeat the export; the patch addresses stay unchanged. |
| "Import failed" | The MVR/GDTF file is damaged or incomplete; the detailed reason is in the Log panel and in stageviz.log. |
| The scene or a panel "ran away" | F frames the scene; the View menu reopens closed panels. |
Support and contact
The application is made by SOH Sound & Lights s.r.o. Questions and support:
eshop@soh.cz (soh.cz). Please include the
app version and edition (About), the problematic MVR or GDTF, a description of the steps and the
stageviz.log file from the application data folder (see Command line and integration).
The full unrestricted version of 3D Stage Visualizer is included with DMX Music Visualization AI — download at soh.cz; the standalone edition is free on the Microsoft Store.